Saturday, November 1, 2008

Battery Box Layout Diagram

I'm still busy with family activities, at work, and with various projects as a mentor of the Tahoma Robotics Club so I currently have very little time to work on this project. However, the good new is that my batteries are on order! Specifically, 50 ThunderSky 160 amp hour batteries. Initially, I plan to use 48 of them at 3.2 volts nominal each for a total of 153.6 total volts. I have been working with Manzanita Micro and they have agreed to order the batteries for me. My original plan was to order the TS batteries direct from China but I dreaded the hassle of getting them through customs.  Manzanita Micro has experience ording these cells as they use them in their prius hybrid kits. So, I sent them a check and now I wait.  The lithium batteries may arrive this year although it won't slow me down any if they don't since my Zilla controller won't be ready until May or June. And so I must be patient...

I created a diagram for those of you who are interested in some of the dimensions and layout of the battery boxes. The 48 ThunderSky cells will completely fill the forward twin battery boxes under the lift bed and a little over half of the rear battery box, leaving me some room for expansion in the future. With 48 of the 160 amp hour cells the total traction pack will contain over 24,000 kwh.  I estimate that this will provide me with a range of 100 plus miles at my average daily driving speeds. But only time will tell...


Notice the red motors in the diagram with not tranmission. I have done a lot of research lately on the possiblity of building a direct drive system. Which basically means connecting the motor or motors directly to the drive line and eliminating the transmission completely. Many people that I have contacted say it can't or shouldn't be done while others seem to disagree. John (coworker and former race car builder/driver) and I have completed many calculations on this subject and have determined that two WarP / Impulse 9 inch motors connect in series will provide ample torque even on hills at slow speeds when controlled by my Zilla and its parallel / series capabilities. So, I am tentatively planning to move forward with this plan and may put an order in for a couple of Impulse 9 motors at the end of this year. I'll keep you posted...

Saturday, October 18, 2008

Build Session 20 (60 mins): Started Prepping Battery Racks for Paint

Finding time to work on my truck lately still seems to be few and far between...
However, I was able to fabricate and weld in a final battery rack support member between the two forward battery racks.
I plan to epoxy coat (paint) the entire frame with POR15 rust protector and chassis coat. I'm currently prepping the frame by removing the rust, dirt, etc...
I'm pretty busy of the next few weeks but I hope to complete the prep work and rack painting by mid November.

Wednesday, October 15, 2008

Ordered a Zilla Z2K Controller Today!

I first discovered the Zilla controller a few years ago when I began my EV conversion research. Ever since then I have been drooling over its rich feature set and performance capabilities.

My decision to upgrade to lithium batteries (LiFePO4) has given me new reasons to pondered the idea of upgrading my 144v Curtis Controller to a Zilla controller because of it capabilities and features. Specifically I want to be able to programatically shut the controller down when any of my Thunder Sky Cells reach their minimum voltage range. This will allow me to protect the cells from under-running damage. In addition, the Zilla will allow me to run higher voltage which means better performance.

Recently I discovered that Otmar who is the founder of Cafe Electric (makers of the Zilla controller) plans to sell the Zilla rights and stop production. So I decided that I'd better buy one before they are completely unavailable and/or even more expensive. The only downside is that it will take 6 to 8 months before my controller will arrive. Once my Zilla arrives I plan to move the Curtis controller to my Porsche 914.

Hmmm.... Now I need a TransWarp 11 motor with direct drive shaft. Then I can eliminate my transmission altogether and really make this truck peppy!

Saturday, October 4, 2008

Build Session 19 (180 mins): Forward Battery Rack Complete, Welding Supports

I completed the battery racks today!
Welded the six supports in place...
The completed forward battery racks...


The rear and forward battery racks...


Friday, October 3, 2008

LiFePO4 Thundersky Batteries and a PFC50B Manzanita Micro Charger

I have decided to go ahead and order 45 Thundersky Lithium Iron Phosphate (LiFePO4) Batteries. My plan was to purchase directly from Everspring.Net in China as I was unable to locate a competitive source of Thundersky cells in the U.S. until recently. However, I am currently working with Manzanita Micro and have ordered their amazing PFC50B charger, LT5B Regulators, and they are building me some custom cell under running detection hardware. In addition, they have agreed to provide me with Thundersky cells at a discount which also allows me to avoid the hassle of dealing with importing the batteries through customs.

So far, I highly recommend this company as their chargers appear to be superior to anything else that I have researched. Clarice (sales) and Stephen are extremely helpful in answering my pre-sales questions (Warning: Don't send too many questions to Rich though...he can be a bit grumpy).


Saturday, September 27, 2008

Build Session 18 (180 mins): Forward Battery Rack, Fabricating Supports

Yes, I finally finished the rear battery rack and am now working to complete the forward battery rack. When complete the rack will hold 32 160ah thundersky batteries or 8 Lead Acid batteries.
First I cut the 4 lengths of 2 inch flat bar for the four U supports...
Then I bent the four pieces into U shapes using the torch and a few clamps...


The four U supports are complete. They will be welded two on each side.


Then I cut and bent the two longitudinal supports.


And thats it...in the next session I will weld them in place and finally be done with the rear battery racks!


Saturday, September 13, 2008

Build Session 17 (60 mins): Rear Battery Rack Complete

Yes it's been a while since my last post. Work is extremely busy right now but I will attempt to make some amount of progress and post at least every week or two. We'll see...
This month I was able to complete the rear battery rack. I made some size modification on the original design to maximize the space for additional LiFePO4 batteries. My current plan is to purchase 45 Thundersky 160ah batteries. I will install 32 of the cells in the forward rear boxes and the remaining 13 cells in this rear box. I estimate the the rear box will hold 34 which I plan to use in the future if I add more cells for a higher voltage system.
Removing the rear cross member support...
Cross member removed...
Working on the final two rear rack supports...more bending.


I made two just like this...


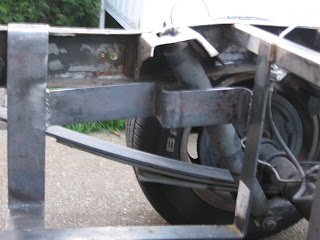
And installed one on each side as depicted below...This will keep the batteries away from the rear shocks.


Tuesday, September 9, 2008

Lead Acid or LiFePO4 (lithium Iron Phosphate) batteries?


In a previous post I indicated that I would most likely purchase the the Trojan T-145 Deep Cycle lead acid battery http://www.trojanbattery.com/Products/T-1456V.aspx. They are supposed to be one of the best deep cycle sealed lead batteries. They are relatively cheap (approx. $3000 total for 24 batteries). Unfortunately, they are also EXTREMELY heavy weighing in around 1700 pounds. Added weight will decrease range and performance. Based on my calculations and verified by several EV'ers that I have contacted I may only see a range of 40 miles using lead acid batteries.  While this may be enough to support much of our daily driving it just doesn't feel like enough for me. Especially when you combine the fact that these lead batteries require regular maintenance (watering) and will degrade over time when not fully charged.  


There may be an alternative... Lithium Iron Phosphate batteries. This battery technology suffers from none of the pitfalls that I mentioned for lead acid batteries and contains many times the amp hour capacity. Plus lithium phosphate cells are 20% of the weight of lead acid batteries which will increase performance. 


I have been researching Lithium batteries for a couple of years and many of you may remember that Jared and I built custom A123 Lithium Nano-phosphate battery packs for our electric bicycles a couple of years ago. The batteries were extremely successful but a lot work, soldiering, etc... In addition, the A123 cells are very expensive. To achieve a range of 75 miles in my S10 EV I would need well over $20,000 worth of A123 cells that must be surface welded "soldiered" into custom packs.


Recently, however, I have rediscovered a potential alternative. Thunder Sky (http://www.thunder-sky.com/products_en.asp?fid=66&fid2=70) LFP cells. I did a little research on these cells a few years ago but found several people who were having problems with some cell batches. However, apparently, newer versions of these cells are popping up in a few Electric Vehicles around the globe and appear to be performing quite well. 
The cells are manufactured in China. I have contacted their primary distributer and it seems that I could get my hands on these 160 amp hour LiFePO4 cells for about $9,000+ shipped to nearest SEA port. I estimate about 75 to 100+ miles range for this amount. Plus no soldiering hundreds of little cells as the Thunder Sky cells are manufactured in large form factor. Just 45 cells will be tied together with bolts and electrical cable. I'm considering purchasing even higher amperage 300 amp hour cells which would cost more but could increase my range to possibly 200+ miles. Yes, I'm drooling...


Anyway, I have been reworking my battery rack design to accommodate either battery technology in case I actually get my hands on some of these cells. :)


Saturday, September 6, 2008

Adapter plate is here...

A couple of weeks ago I sent the clutch disc from my S-10 (actually I ordered a new one and sent that) to a machine shop specified by EV-America. They disassembled the disc and  milled out the a the center portion of the adaptor plate assembly from 1/2 inch 6061 aluminum. In the near future I will attach this plate to my S-10 transmission, take some measurements, and then mill the transmission mating holes for attaching the plate. Then I plan to cut down the excess around the corner and perhaps follow the contours of the transmission bell housing. After that I will attach the Advanced DC 9 inch FB1 electric motor to the adaptor plate and transmission.


Wednesday, September 3, 2008

Build Session 16 (90 mins): Rear Battery Rack Welding Cross Member

Yes, I'm still working on the rear battery rack. :) One more day and I should have the rear rack finished.

First I prepped the flat bar cross member that I bent yesterday. I'm using the wire attachment on the Makita to remove the rust.
Prepping the frame...
Measuring the distance at the top of the new cross member to make sure that its slightly more (1/2 inch) than the 31 inches at the bottom of the cross member. This will allow the battery box to slide in easier. The cross member is clamped into place and I tapped it into position with a hammer.
Then I welded the cross member into place.

In case you're wonder what welder I'm using...
It's a Lincoln Power Mig 140c Welder. I'm not using MIG right now just .035 inch Flux Core Welding Wire and it seems to be working great for this application. The bottle on the back of the welder currently is Argon which I use when I am welding aluminum. I use argon with the spool gun pictured below.
.035 inch Flux Core Welding Wire
100 SG spool gun used for welding aluminum and other types of metal.
Anyway, back to business here...Then I wire brushed the area where the flat bar cross member supports meet, clamped them together, and welded all three of them in place. That's it for tonight.


Tuesday, September 2, 2008

Build Session 15 (45 mins): Rear Battery Rack Cross Member Bending

Not much time again tonight...but it was enough to cut and bend a piece of 3 inch flat bar for the rear battery box rack. This piece will provide cross support for the rear battery rack. The flat bar is 1/4 inch thick. I cut it 68 inches which turns out to be a 1/2 inch or so to long (I'll fix that tomorrow when I weld it in place).

I convinced my oldest son Matt to step away from his laptop long enough to work square up this piece and help me bend it.
Using the torch to heat the steel...
Matt is learning how to use the torch...he did a great job!
Me...trimming the acetylene...
Preparing for the third bend...
Not much leverage so Matt used the sledge on this bend...
The new 3 inch cross bar sitting in place... I plan to trim the ends down an inch and weld it in place tomorrow.

A video of Matt using the torch.

Friday, August 29, 2008

Build Session 14 (30 mins): Battery Rack Build Session 7

Tonight I cut (most of) the rear support section out of the Chevy S10 frame. This piece needs to be removed to make room for the polyurethane battery boxes that I will build in the near future. That sums up my accomplishments for this weekend as I am camping with the family at Whidbey Island.

Using the Makita with a cut-off wheel...


Support section removed...


I plan to remove the rest of this support section after completing the rear battery rack and adding additional support to the shock mounts.

Thursday, August 28, 2008

Build Session 13 (1 hour): Rear Battery Rack Welding

Back from San Diego and ready to work on the truck...

I did get three of the support bars welded into the rear battery rack tonight.

Of course I wouldn't have been able to do it as fast without a little help from Tayler.


We clamped the "U" shaped pieces into place and squared and welded them to the support tubes (one side at a time).

Notice the surface rust building up already...don't worry, my POR15 chassis coat epoxy showed up last week. As soon as these battery racks are done I will prep and paint. :)


Tayler with a wire brush...I wish that I could get her to scrub the dishes this good. :)


Using the Makita wire brush to clean up my welds.


Three pieces welded in place. In my next session I will build 3 additional pieces to complete this rear battery rack.


The POR15 showed up! This will protect the frame and battery racks...plus it will look great.